If you’ve found this guide then you likely already know what a Windows themepack is, but for those who don’t, here’s a quick example:
Requirements
You will need:
- Windows 7 or newer
- About a day’s worth of free time
- Basic computer skills
Note that whilst I created this guide for Windows 10 it should still be applicable for other version of Windows. You just might notice a few minor differences between what the guide says and what you see in front of you.
Exploring the Themes Settings Menu
To start with you’ll want to familiarize yourself with the Themes settings menu. This is the settings menu that you’ll use to create your theme.
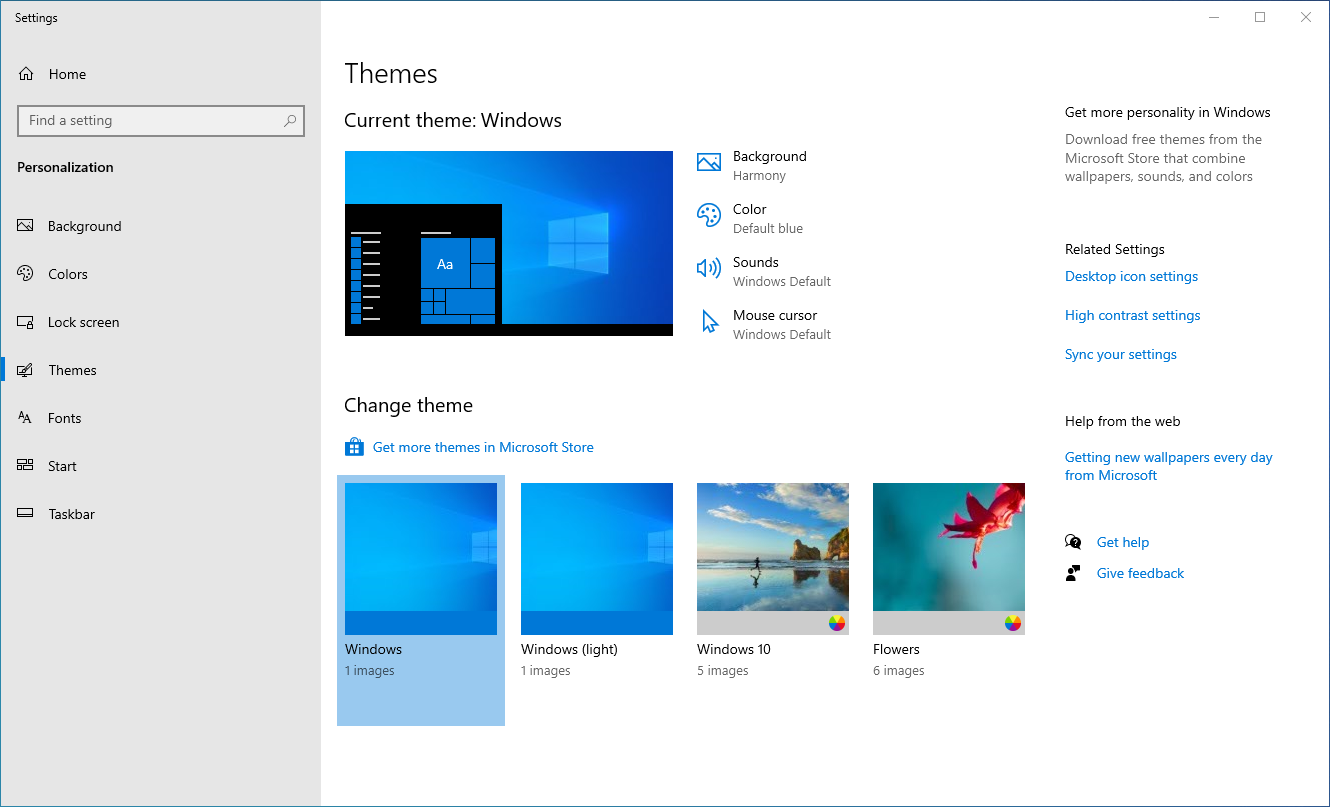
Open up the Settings app and select “Personalization” and then “Themes”. You should see a window that looks like this:

This is the Themes settings menu. From here you can apply an installed theme or customize your current theme.
Resetting the Current Theme
Next you’ll want to reset your current theme back to the default theme. This is because saving your theme works by saving a snapshot of all of your current personalization settings. This means that it is not possible for your theme to not change some personalization settings.
However if you reset your current theme back to the default theme then your users will get the default settings for any settings that you do not change. Whilst this is still not ideal it is the best option available.
To reset your current theme back to the default theme select the “Windows” theme from the Themes settings menu.
Creating Your Theme
Finally it’s time to start actually creating your theme.
From the Themes settings menu you can access the five sub-menus that you’ll use to customize your theme. These are:
- “Background” for customizing the desktop background
- “Color” for customizing the system colors
- “Sounds” for customizing the system sounds
- “Mouse cursor” for customizing the system mouse cursors
- “Desktop icon settings” (on the right, underneath “Related Settings”) for customizing the desktop icons
Go through each of these submenus making changes until you’re happy with your theme. I’ve included guidance below for each submenu.
Background
You must save all of your background images in one of the following file formats: “bmp”, “gif”, “jpg”, “png”, or “tif”. Background images cannot contain transparency.
Color
You’ll want to customize this after you’ve finished customizing your theme’s Background settings.
Sounds
You must save all of your sounds in “wav” format.
You can find a complete reference for what triggers every system sound here. Note that not every program event has a default sound associated with it.
Additionally there is a bug (at least in Windows 10) where themepacks cannot modify “new” notification sounds (Most of what’s under Notifications and everything under NFP) so you’ll want to ignore those program events.
If you need audio recording software then I recommend Audacity.
Make sure to save your sound scheme once you’ve finished creating it. I recommend saving it with your theme’s name.
Mouse Cursor
You must save all of your mouse cursor icons in either “cur” (static) or “ani” (animated) formats.
I recommend not changing the hand cursor icons (Link Select, Location Select, and Person Select) because you cannot change the “Grab Select” cursor icon.
If you need cursor editing software then I recommend RealWorld Cursor Editor. The site might look a little dated but the software is kept up to date. If you don’t want to install it then you can use the portable version instead. Or if you want something simpler that’ll let you edit directly from the browser then I recommend cursor.cc.
Make sure to save your mouse cursor scheme once you’ve finished creating it. I recommend saving it with your theme’s name.
Desktop Icons Settings
You must save all of your desktop icons in “ico” format. “ico” files cannot have an resolution of greater than 256*256 pixels and should have an resolution of exactly 256*256 pixels.
If your graphics editor cannot save in “ico” format then I recommend saving in “png” format and then using an online “png” to “ico” convertor.
I recommend only changing the recycle bin icons (if any). Whilst you can change the other desktop icons the recycle bin is the only icon enabled by default. Since people rarely enable other desktop icons there isn’t much point in customizing them.
Saving Your Theme for Sharing
Once you’re happy with your theme it’s time to save it for sharing:
- Save your theme in the Themes settings. This will save it locally.
- Right click on the theme and select “Save theme for sharing”. This will save your theme as a “deskthemepack” file that you can then share with others.
That’s it! All someone else needs to do now to install your theme is to download your themepack file and then double click it.